Building the PREEMPT_RT-patched Linux Kernel
Note to reader
The bulk of this post was written back in November 2020, when we had no idea about what we were facing, and was essentially completed in February 2021: In the end, I installed Ubuntu 20.10 on my main laptop and have been using it along with the
lowlatencykernel as a convenient development machine, and migrated to the self-built RT kernel on the X220, abandoning ROS completely in the process.Of course I completely forgot to publish it and I’ve been holding it up until now (May-June 2021).
Before graduating, our university mandates that we spend at least three months working on a project, either in an university lab or in an external facility, and then prepare an extensive report of our activities.
I’ve decided to work with our Mobile Robotics lab on a project that involves ROS and the Linux Kernel, and I’ve been tasked with exploring the possibility of making the system behave in a real-time manner.
To do so, my first step has been installing the target operating system, Ubuntu 20.04, on my machine (a Lenovo X220) so I can work on the project from home and I decided to try and build the PREEMPT_RT patched kernel so I could start taking advantage of it.
The initial idea was pretty simple: build the kernel and write an application that uses both the scheduler and some ROS components, but I’ve seriously been wondering whether or not it’s a good idea, because of the complexity of using SCHED_DEADLINE.
Building the kernel
Building an RT-patched kernel is a straightforward process, and this well-written article outlines the process.
Downloading and unpacking the sources
The kernel team provides either the full, already patched, kernel sources or a patch that can be applied onto the mainline tarball. Not being familiar with the patching process I decided to go with the former, and I downloaded the 5.4.74-rt41-rebase archive. Once the download completes, I unpacked the archive somewhere in my home directory (let’s say, hypothetically, ~/linux-stable-rt-5.4.74-rt41-rebase). Be wary that the sources are quite heavy, around the gigabyte mark.
Configuring the kernel
Once the archive has been unpacked, the kernel must be configured: to do so there are some tools provided by the developers that take care of modifying the appropriate makefiles automatically. First of all we must create a base configuration, pilfering it from the kernel we’re currently running:
$ cd ~/linux-stable-rt-5.4.74-rt41-rebase
$ cp /boot/config-$(uname -r) .config
$ make olddefconfig
At this point the configuration files have been initialized and we are ready to select the preemption mechanism:
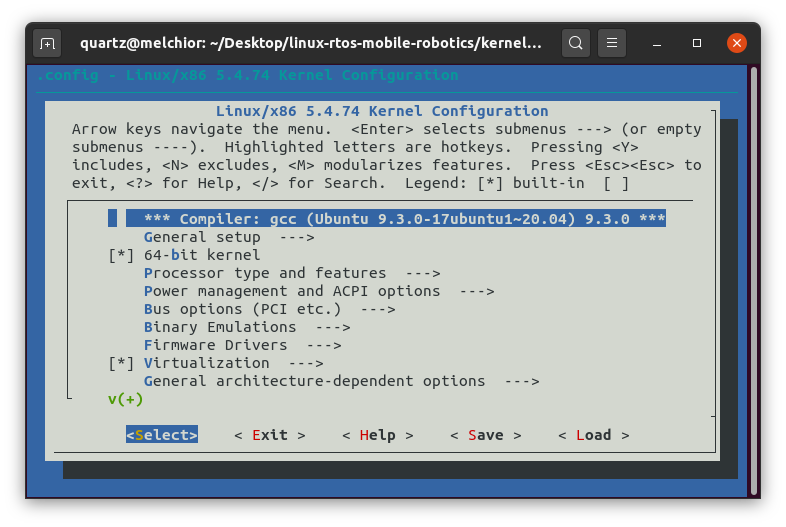
$ make menuconfig

The colorful interface presented by menuconfig
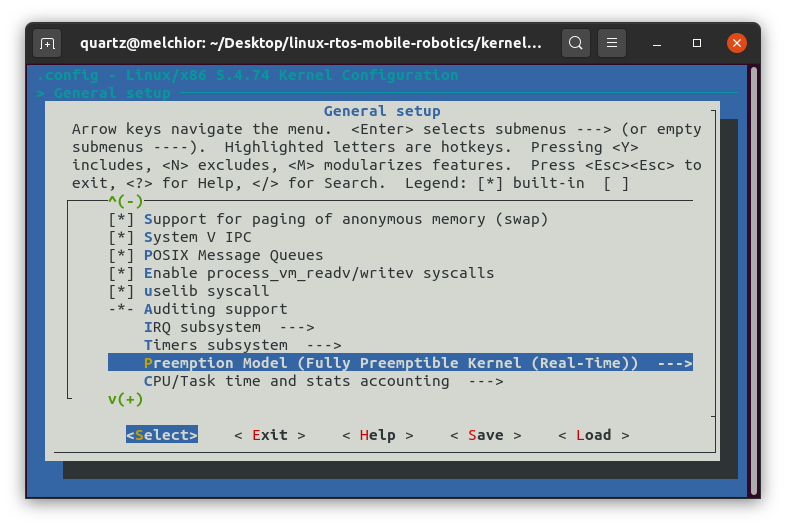
menuconfig is an ncurses-based tool that lets us modify the kernel parameters so we can obtain different configurations. Many aspects of the kernel’s behavior can be changed by recompiling it with different options, but let’s focus specifically on the ones we need: open General Setup → Preemption Model and select Fully Preemptible Kernel (Real-Time) instead of Voluntary Kernel Preemption (Desktop).

Selecting the scheduling policy
Using the tabulation key, navigate to the Select button: you’ll notice that the scheduler’s name has been changed. Navigate once again to the Save button: when prompted to select an alternate filename, simply select Ok. You can now quit menuconfig.
Building the kernel
Note
You’ll probably need to run the following:
scripts/config --disable SYSTEM_TRUSTED_KEYSFor reasons I’ve not been able to confirm. See https://www.mail-archive.com/kernelnewbies@kernelnewbies.org/msg21536.html.
This is by far the least complicated step:
$ make -j $(nproc) deb-pkg
The -j $(nproc) argument will make optimal use of your processor’s resources by distributing the load on every available core: if omitted, it defaults to one core. Be noted that building the kernel is a lengthy process: it took me about four hours (you can track that by putting time before the aforementioned command), so don’t be afraid of putting your processor to use. The deb-pkg makefile target acts in a very convenient way: instead of just providing a kernel image, it creates a package that can be installed on Debian-family distros with tools like dpkg or gdebi, greatly simplifying the following process.
Installing the kernel
Thanks to the deb-pkg target, installing the kernel is dead-simple. First of all, we can obtain a description of the packages. Issuing:
for pkg in ./*.deb; do echo " Package: $pkg" && dpkg-deb --info $pkg | grep -A5 "Description" && echo ""; done
…yields:
 Package: ./linux-headers-5.4.74-rt41_5.4.74-rt41-1_amd64.deb
 Description: Linux kernel headers for 5.4.74-rt41 on amd64
  This package provides kernel header files for 5.4.74-rt41 on amd64
  .
  This is useful for people who need to build external modules

 Package: ./linux-image-5.4.74-rt41_5.4.74-rt41-1_amd64.deb
 Description: Linux kernel, version 5.4.74-rt41
  This package contains the Linux kernel, modules and corresponding other
  files, version: 5.4.74-rt41.

 Package: ./linux-image-5.4.74-rt41-dbg_5.4.74-rt41-1_amd64.deb
 Description: Linux kernel debugging symbols for 5.4.74-rt41
  This package will come in handy if you need to debug the kernel. It provides
  all the necessary debug symbols for the kernel and its modules.

 Package: ./linux-libc-dev_5.4.74-rt41-1_amd64.deb
 Description: Linux support headers for userspace development
  This package provides userspaces headers from the Linux kernel.  These headers
  are used by the installed headers for GNU glibc and other system libraries.
Now, installing them is pretty simple. You can either use dpkg or double-click on them and use the graphical installer. Let’s assume the former:
for pkg in ./*.deb; do sudo dpkg -i $pkg; done
Will install the kernel and headers, and automatically build the appropriate initrd and add a new default entry for the kernel in the GRUB bootloader.
